- 您现在的位置:买卖IC网 > Sheet目录19096 > CUB7P120 (Red Lion Controls)COUNTER 8-DIGIT VOLTAGE RED
�� �
�
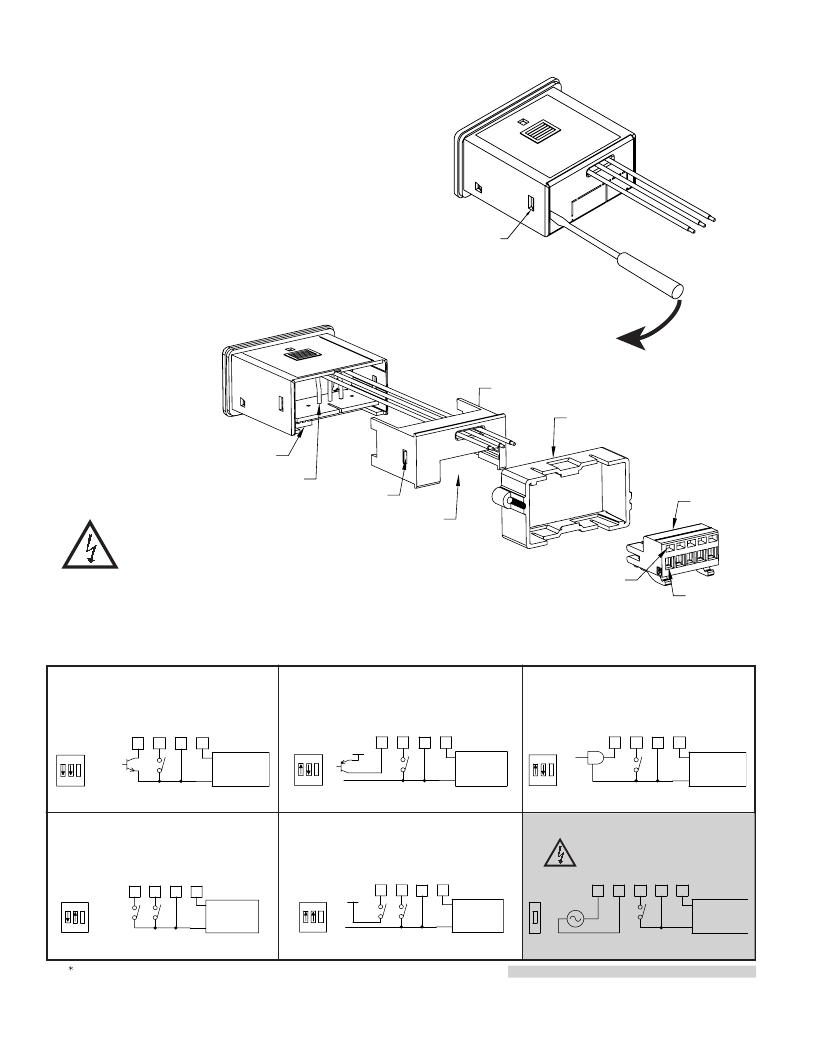
�USING� THE� OPTIONAL� TERMINAL� BLOCK�
�1.� Remove� the� rear� cover.� Refer� to� Figure� 1.� A� small� slotted� screwdriver� is�
�required� to� release� the� side� latches.� Insert� the� screwdriver� tip� between� the�
�rear� cover� and� the� side� of� the� unit.� Leverage� the� screwdriver� away� from� the�
�case� to� unlatch� the� side� latch� and� slightly� lift� the� rear� cover.� Pinch� the�
�corners� to� hold� the� rear� cover� in� place.� Remove� the� screwdriver� and� repeat�
�the� same� procedure� on� the� other� side� of� the� rear� cover.� When� both� side�
�latches� are� released,� slide� the� rear� cover� from� the� unit� and� the� wires.�
�2.� For� safety� concerns,� the� wires� should� be� cut� off� completely� flush� with� the� PC�
�board� to� prevent� a� short.�
�3.� Break� out� the� break� away� tab(s)� as� required.� Remove� the� left� tab� only� for� 3�
�position� terminal� block� or� both� tabs� for� 4� and� 5� position� terminal� blocks.�
�4.� Reinstall� the� rear� cover� into� CUB7� unit.�
�5.� Mount� the� CUB7� into� the� panel� (refer� to� 1.0� Installing� The� Meter)�
�6.� Push� the� keyed� terminal� block� onto� the� exposed� PC� board.� The� left� most�
�terminal,� next� to� the� DIP� switch(s)� is� terminal� #1.�
�Note:� Wire� sizes� 16-24� AWG� may� be� used� with� 0.25"� length� exposed.� The�
�screwless� type� terminal� block� requires� a� small� slotted� screwdriver� engaged� in�
�the� upper� slot� to� open� the� wire� clamp� in� the� lower� larger� slot.� Removing� the�
�screwdriver� will� lock� the� wire� clamp� unto� the� wire.�
�Side�
�Latches�
�Figure� 1�
�Rear� Cover�
�Mounting� Clip�
�DIP� Switch(s)�
�Cut� Wires� Internally�
�(If� using� Optional�
�Terminal� Block)�
�Wires� must� be� cut� off� completely�
�flush� with� PC� board.�
�Side� Latches�
�Break-out� Tab� or� Tabs�
�(If� using� Optional�
�Terminal� Block)�
�Open� &� Lock�
�Wire� Clamp�
�Optional�
�Terminal� Block�
�Terminal� #1�
�Current� Sinking� Output�
�Current� Sourcing� Output�
�Logic� Output�
�ON�
�*�
�1� 2� 3�
�1�
�2�
�3�
�4�
�+�
�?�
�Optional�
�Backlight�
�Power�
�ON�
�*�
�1� 2� 3�
�+V�
�1�
�2�
�3�
�4�
�+�
�?�
�Optional�
�Backlight�
�Power�
�ON�
�*�
�1� 2� 3�
�1�
�2�
�3�
�4�
�+�
�?�
�Optional�
�Backlight�
�Power�
�Switch/Contact� Sinking� Output�
�Switch/Contact� Sourcing� Output�
�High� Voltage�
�ON�
�*�
�1� 2� 3�
�1�
�2�
�3�
�4�
�+�
�?�
�Optional�
�Backlight�
�Power�
�ON�
�*�
�1� 2� 3�
�+V�
�1�
�2�
�3�
�4�
�+�
�?�
�Optional�
�Backlight�
�Power�
�ON�
�*�
�3�
�50-250�
�VDC/VAC�
�1�
�2�
�3�
�4�
�5�
�+�
�?�
�Optional�
�Backlight�
�Power�
�Switch� position� is� application� dependent.�
�6�
�Shaded� area� for� high� voltage� applications.�
�发布紧急采购,3分钟左右您将得到回复。
相关PDF资料
5652F1-5V
LED RED T1 QUAD RT ANG 5V PCB
FXO-HC526R-125
OSC 125 MHZ 2.5V HCMOS SMD
183566
LED T-1 28V .100" BI-PIN BASE
CUB7P110
COUNTER 8-DIGIT VOLTAGE GREEN
5335H3-5V
LED T1-3/4 AMBER 603NM VAR HT
CUB7P320
COUNTER 8-DIGIT LV RED BACKLIGHT
5335H1-5V
LED T1-3/4 RED 635NM VAR HT
5330H3-5V
LED T1-3/4 AMBER 583NM VAR HT
相关代理商/技术参数
CUB7P200
功能描述:HSPEED LOGIC INPUT CNTR POS RoHS:是 类别:工业控制,仪表 >> 计数器 系列:CUB7 其它有关文件:Declaration of Conformity 标准包装:1 系列:99766 计数速率:25Hz 数字/字母数:5 输入类型:机电式脉冲 输出类型:- 电源电压:24V 显示器类型:十进制拨轮
CUB7P210
功能描述:COUNTER 8-DIGIT LOGIC GREEN RoHS:是 类别:工业控制,仪表 >> 计数器 系列:CUB7 其它有关文件:Declaration of Conformity 标准包装:1 系列:99766 计数速率:25Hz 数字/字母数:5 输入类型:机电式脉冲 输出类型:- 电源电压:24V 显示器类型:十进制拨轮
CUB7P220
功能描述:COUNTER 8-DIGIT LOGIC RED RoHS:是 类别:工业控制,仪表 >> 计数器 系列:CUB7 其它有关文件:Declaration of Conformity 标准包装:1 系列:99766 计数速率:25Hz 数字/字母数:5 输入类型:机电式脉冲 输出类型:- 电源电压:24V 显示器类型:十进制拨轮
CUB7P300
功能描述:COUNTER 8-DIGIT LV REFLECTIVE RoHS:是 类别:工业控制,仪表 >> 计数器 系列:CUB7 其它有关文件:Declaration of Conformity 标准包装:1 系列:99766 计数速率:25Hz 数字/字母数:5 输入类型:机电式脉冲 输出类型:- 电源电压:24V 显示器类型:十进制拨轮
CUB7P310
功能描述:COUNTER 8-DIGIT LV GRN BACKLIGHT RoHS:是 类别:工业控制,仪表 >> 计数器 系列:CUB7 其它有关文件:Declaration of Conformity 标准包装:1 系列:99766 计数速率:25Hz 数字/字母数:5 输入类型:机电式脉冲 输出类型:- 电源电压:24V 显示器类型:十进制拨轮
CUB7P320
功能描述:COUNTER 8-DIGIT LV RED BACKLIGHT RoHS:是 类别:工业控制,仪表 >> 计数器 系列:CUB7 其它有关文件:Declaration of Conformity 标准包装:1 系列:99766 计数速率:25Hz 数字/字母数:5 输入类型:机电式脉冲 输出类型:- 电源电压:24V 显示器类型:十进制拨轮
CUB7T000
功能描述:TIMER LCD PROGRAM 8 DIGIT RoHS:是 类别:工业控制,仪表 >> 定时器 系列:CUB7 标准包装:10 系列:- 计时范围:- 工作模式:累积 输出类型:- 电源电压:4.5 V ~ 10 V 端接类型:PCB 引脚 显示器类型:无显示器 其它名称:2001PC-001 5VDCQ1273012Q1443992
CUB7T100
功能描述:TIMER LCD PROGRAM V IN 8 DIGIT RoHS:是 类别:工业控制,仪表 >> 定时器 系列:CUB7 标准包装:10 系列:- 计时范围:- 工作模式:累积 输出类型:- 电源电压:4.5 V ~ 10 V 端接类型:PCB 引脚 显示器类型:无显示器 其它名称:2001PC-001 5VDCQ1273012Q1443992